Home Improvement
Drywall Repair: Professional Techniques for Flawless Wall Restoration
You can fix most drywall damage yourself with the right tools and a simple process, and this post shows the practical steps and decisions that make the job straightforward. You’ll learn how to assess damage, choose the proper patching method, and follow a clear step-by-step repair routine so you can restore clean, paint-ready walls.
Followable instructions in Drywall Repair will guide you through identifying whether a dent, crack, or hole needs a quick patch, a taped seam, or panel replacement, and when to call a pro. Expect concise tips on sanding, mudding, and finishing that save time and prevent common mistakes so your repair looks professional.
Understanding Drywall Repair
In this post drywalls repair You’ll learn what typically damages drywall, how to recognize repair needs, and which tools and materials to have on hand to finish the job correctly. Each part focuses on specific, actionable details you can use when assessing or fixing walls and ceilings.
Common Causes of Drywall Damage
Water is the most frequent culprit: slow roof leaks, burst pipes, and high-humidity rooms cause paper delamination, bubbling, and mold stains. Pay attention to locations near bathrooms, kitchens, and exterior walls where moisture collects.
Impact damage arises from door knobs, furniture, and accidental hits; these produce dents, punctures, and holes ranging from nail-size to several inches. Structural movement—settling, floor-to-ceiling shrinkage, and framing shifts—creates long cracks along seams or corners.
Poor installation and finishing can show as joint cracks, tape bubbling, or uneven texture. Older homes often have multiple small problems concentrated around windows, door frames, and corners.
Signs Your Drywall Needs Repair
Look for visible holes, long hairline or stair-step cracks, and peeling or discolored paint; these are clear repair signals. Press lightly around suspicious areas—soft or spongy drywall indicates moisture damage and potential mold behind the surface.
Listen for rattling or hollow spots when you tap; that usually means loose drywall or failed adhesive at the seams. Notice uneven texture or shadow lines after painting—those reveal poor prior repairs or sanding problems.
Measure the extent: hairline cracks can be DIY patched, while holes larger than 4 inches or water-damaged panels generally require cutting out and replacing the affected section. If you find mold, inspect the cause and consider professional remediation before cosmetic repair.
Tools and Materials Required
Essential tools: utility knife, 6–12 inch drywall knife, 4–6 inch joint knife, sanding sponge (medium/fine), taping knife, and a drywall saw or oscillating multi-tool for larger cuts. Keep a mud pan and mixing drill paddle if you use powdered joint compound.
Materials: joint compound (pre-mixed and/or setting-type), drywall tape (paper or fiberglass mesh), ½” or ⅝” drywall sheets to match existing thickness, screws or drywall nails, wood backing or metal patch kits for larger holes, and primer plus matching paint. For moisture issues, include mold-resistant drywall and a moisture meter.
Safety and finishing supplies: dust mask or respirator, safety glasses, drop cloths, and a vacuum for cleanup. Choose a setting compound for fast repairs and a drying compound for feathering and final coats.
Step-by-Step Drywall Repair Process
This section gives practical steps for assessing damage, choosing the right patch method, applying joint compound, and finishing a smooth, paint-ready surface.
Preparing the Damaged Area
Clear loose material by cutting back ragged paper and crumbling gypsum with a utility knife. Remove dust and debris with a brush or vacuum so joint compound adheres properly.
Locate any studs or backing behind the hole; mark their positions with a stud finder or tapping method. You’ll need solid backing for patches larger than about 2 inches.
For electrical or plumbing near the damage, turn off power or water and inspect behind the drywall before proceeding. Wear safety glasses and a dust mask while cutting and sanding.
Patching Small Holes and Cracks
For nail pops, hairline cracks, and holes up to 2 inches, use a premixed joint compound or spackling paste. Apply with a putty knife, pressing compound into the void, then feather edges outward about 2–3 inches to blend with the wall.
For cracks, widen slightly with a utility knife to create a V-groove; this gives compound something to key into. Allow the first coat to dry fully (follow product directions), then apply a second thin coat and feather again.
Sand between coats with fine-grit (120–180) sandpaper, remove dust, and spot-prime patched areas before painting for uniform finish.
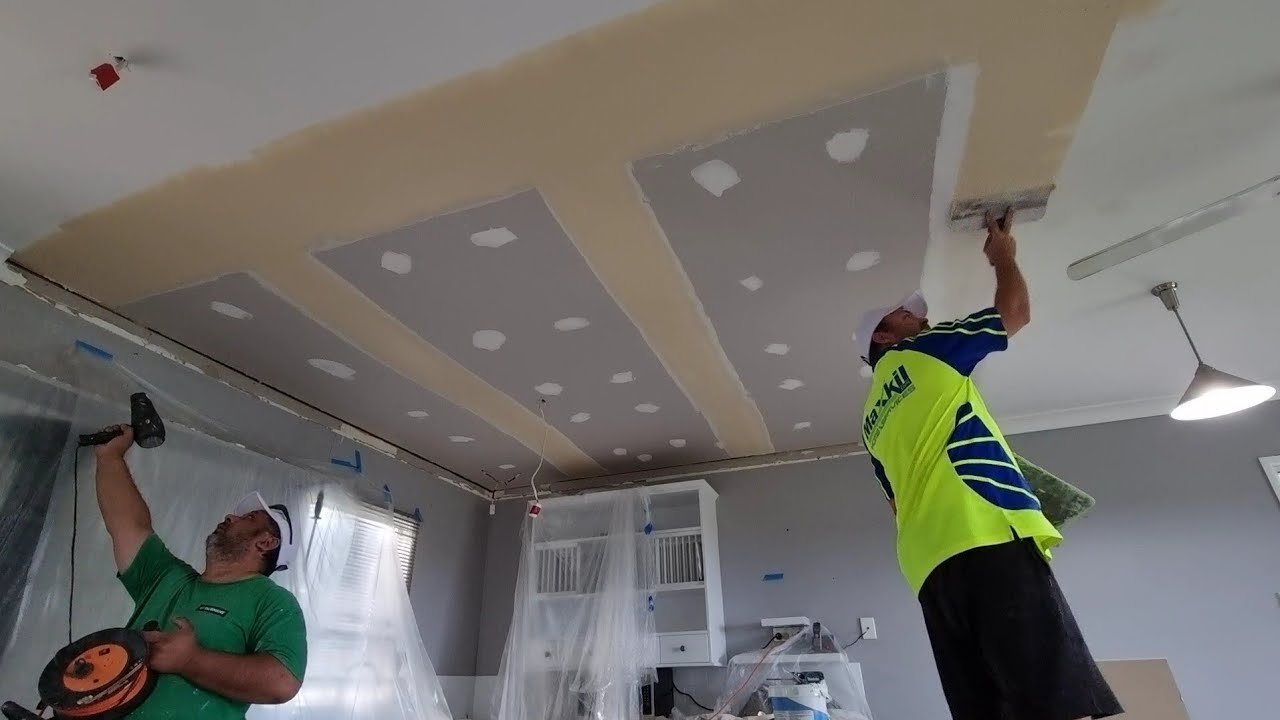
Repairing Large Holes
Cut the damaged area into a neat square or rectangle using a drywall saw. Measure and cut a drywall patch to fit, leaving a 1/8-inch gap for joint compound. Install wood backing (1×2 strip) inside the opening screwed through the existing drywall; fasten the patch to the backing with drywall screws every 8–12 inches.
Tape the seams with fiberglass mesh or paper tape, then apply a first coat of joint compound over tape, pressing out bubbles. Let dry, then apply two additional thin coats, each wider than the previous, to build a smooth transition.
Use countersunk screws and avoid overdriving. If patching ceiling drywall, support the patch with a second pair of hands or a drywall lift to keep it flush.
Finishing and Sanding Techniques
After final coat dries, sand using a sanding block or pole sander with 120–220 grit depending on compound hardness. Sand lightly to avoid gouging; aim for a flat, feathered edge where the patch meets the wall.
Clean dust with a dry microfiber cloth or vacuum, then apply a primer designed for drywall patches to seal the joint compound and ensure paint adhesion. Use a roller for texture matching; if the wall has a specific texture, recreate it with a texture spray or brush before painting.
Inspect under directional light to catch imperfections; spot-fill and re-sand if needed, then finish with two coats of paint for uniform coverage.

Looking to expand your living space without moving? You can find local contractors who design and build home additions that match your budget, property, and long-term goals — from second-floor expansions to basement conversions. Start by pinpointing the type of home additions you want and comparing nearby professionals so you hire someone with the right experience and trustworthy references.
In Home Additions Near Me, You’ll learn how common addition types fit different lots and budgets, what questions to ask potential contractors, and how to evaluate quotes and portfolios so you avoid costly surprises. Use that guidance to move from idea to plan with confidence and keep your project on schedule and on budget.
Types of Home Additions
You’ll find several practical ways to add living space, increase home value, and address specific needs like extra bedrooms, an updated kitchen, or more storage. Choose the type that fits your lot, budget, and the structural capacity of your house.
Room Expansions
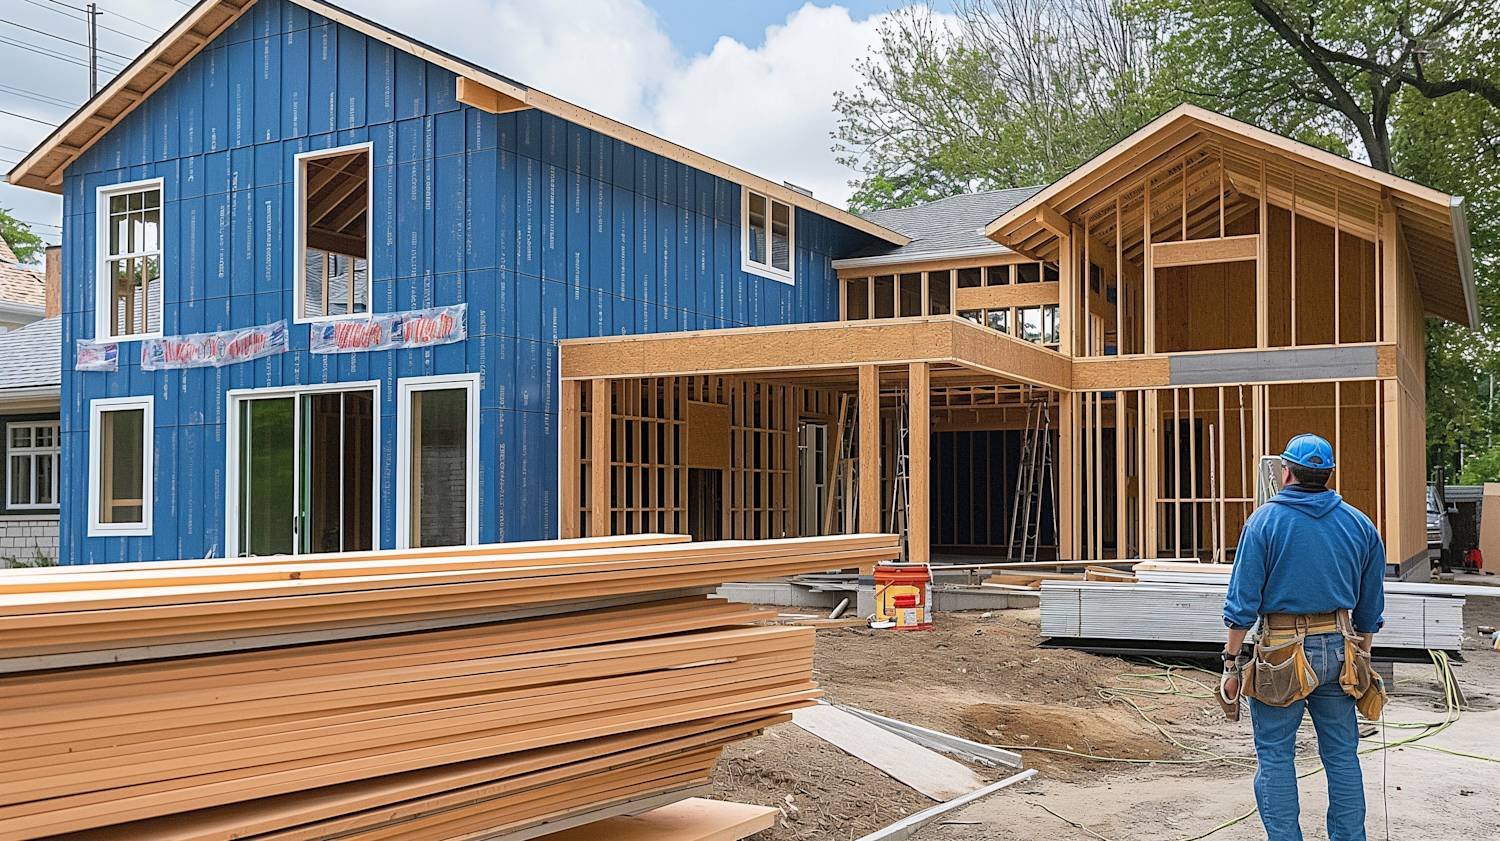
Room expansions extend an existing footprint—common examples are kitchen bump-outs, enlarged family rooms, and master suite extensions. You gain usable square footage without altering the roofline dramatically, which often simplifies permitting and reduces cost compared with multi-story work.
Plan around load-bearing walls, window placement, and mechanical routing. Expect new foundation work or reinforced footings for the added slab or crawlspace; that drives much of the cost. Consider how the addition will connect to HVAC, plumbing, and electrical systems to avoid costly retrofits later.
Design decisions you’ll make include floor-to-ceiling alignment, matched exterior materials for curb continuity, and door/window sizes to maximize light. If you want open-plan flow, remove or relocate interior walls and coordinate structural support with your contractor and engineer.
Second Story Additions
A second story addition doubles living area without using extra lot space, which works well on small lots or when zoning limits footprint expansion. You typically leave the first-floor layout intact while adding full rooms above—bedrooms, bathrooms, or a primary suite.
You must assess existing foundation capacity and first-floor framing; many homes require foundation underpinning or beam reinforcement. Budget for scaffolding, temporary roofing, and comprehensive trades (framing, roofing, insulation, siding, stair construction). Expect longer timelines and higher permitting scrutiny than single-story work.
Think about stair placement, headroom, and how new second-story windows affect privacy and neighborhood sightlines. Match exterior finishes and roof pitch to maintain resale appeal. Plan mechanical extensions for HVAC, and consider adding a new air handler or zoning to maintain comfort upstairs.
Garage Conversions
Garage conversions turn underused vehicle storage into livable space—common conversions include home offices, guest suites, studios, or accessory dwelling units (ADUs) where local codes allow. You’ll avoid new foundation work if the slab is sound, which often makes conversions cost-effective.
Key tasks include insulating exterior walls and the ceiling, replacing the garage door with framed wall and windows, and upgrading electrical and HVAC to meet code for habitable space. Address moisture control and slab leveling; some conversions require slab cutting for plumbing if you’re adding a bathroom or kitchenette.
Check zoning and permit rules early—some municipalities treat ADUs differently and may require separate exits, parking adjustments, or utility metering. Finish choices like flooring, soundproofing, and natural light investments greatly influence comfort and long-term value.
Choosing the Right Home Addition Contractor
You need a contractor who understands local codes, shows a clear track record on similar projects, and provides transparent, comparable bids. Focus on evidence: permits, photos of completed additions, itemized estimates, and verifiable references.
Evaluating Local Experience
Look for contractors with repeat work in your neighborhood or borough. Local experience means they know zoning rules, typical foundation and framing details for nearby housing stock, and which inspectors to contact.
Ask for copies of recent permits and the addresses of finished jobs you can visit or view online. Verify trade licenses, insurance certificates, and membership in local trade associations.
Check how long the crew has worked together and whether the contractor uses subcontractors. A stable team reduces surprises and scheduling delays. Also confirm experience with your specific addition type—bump-out, second-story, or basement—because techniques and risks differ.
Reviewing Portfolios
Request a portfolio showing at least five completed projects similar in scope to yours. Look for before-and-after photos, material lists, and notes on structural changes. Photos should reveal details: connections to existing framing, roof tie-ins, and finished interior transitions.
Ask for references and contact past clients about timelines, communication, and punch-list resolution. If possible, visit a recent job in person to inspect quality—flush trim, even paint lines, proper flashing, and neat exterior joints indicate care. Save portfolio items that match your style and budget as discussion points.
Comparing Quotes
Collect detailed, itemized bids from at least three contractors. Each quote should include labor hours, material specifications (brands and grades), subcontractor costs, permit fees, and a clear payment schedule. Avoid bids that only list a lump-sum without line items.
Compare timelines, warranty terms, and change-order policies side by side. Use a simple table to track differences:
| Item | Contractor A | Contractor B | Contractor C |
|---|---|---|---|
| Total bid | $ | $ | $ |
| Materials (brand/spec) | |||
| Start / completion dates | |||
| Permit responsibility | |||
| Warranty (years) |
Choose the bid that balances clear scope, realistic schedule, and documented protections rather than the lowest price alone.

Planning a condo renovation Toronto can feel overwhelming, but you can navigate permits, building rules, and tight layouts with the right plan and professionals. A clear budget, a condo-savvy contractor, and an understanding of building restrictions will keep your project on time and compliant while maximizing value.
This article walks you through the essential steps—from approvals and insurance to selecting finishes and contractors—so you know what to expect and where to invest for the best returns. You’ll learn practical ways to protect your investment and get the most value from every dollar and decision.
Essential Steps for Condo Renovation in Toronto
Focus on accurate budgeting, condo board approvals, licensed contractors, and design choices that meet building rules and the Toronto Building Code. Prioritize permits, noise and access schedules, and clear contract terms to avoid delays and extra costs.
Planning and Budgeting
Start by listing scope items: demolition, plumbing, electrical, flooring, cabinetry, fixtures, and finishing. Get at least three itemized quotes and compare line-by-line.
Include contingency of 10–20% for unforeseen issues like water damage or asbestos. Factor in condo move-in/move-out fees, elevator booking charges, and noise-window penalties often charged by buildings.
Track costs in a simple spreadsheet with columns for estimate, deposit, paid, and balance. Schedule payments to align with milestones: deposit, mid-project, completion. Confirm who pays for common-element repairs if your work impacts walls, soffits, or mechanical rooms.
Understanding Toronto Condo Bylaws
Request the condo corporation’s renovation package and current bylaws before you sign a contractor. These documents specify permitted hours, required notices to neighbours, insurance limits (commonly $2M or more), and mandatory protective measures for common elements.
Most buildings require a detailed scope, plans, contractor proof of WSIB and liability insurance, and a refundable damage deposit.
Determine whether your project triggers a City of Toronto building permit—typically structural, plumbing, and new electrical work do. Submit condo board approval as part of permit documentation when required. Keep written approvals and all communications; condos often require final inspections and a restoration checklist.
Choosing the Right Contractor
Hire a contractor experienced with Toronto condos and the specific building you’re renovating. Ask for references from past condo clients, photos of similar projects, and examples of dealing with condo management and elevator scheduling.
Verify the contractor’s license, WSIB clearance, and liability insurance limits that meet your condo’s requirements. Insist on a written contract that lists scope, materials (make/model), exact colours, start and completion dates, payment schedule, and a change-order process.
Specify responsibility for permits, site protection, debris removal, and common-area repairs in the contract. Agree on a waste-management plan and elevator use protocol to limit fines. Keep a communications log with the contractor and condo office for disputes.
Design Considerations
Choose materials and systems that comply with building rules for fire rating, sound transmission (STC/IIC ratings), and weight limits for penthouse or balcony installations. For kitchens and bathrooms, pick low-flow fixtures and tankless or high-efficiency water heaters if mechanical space allows.
Prioritize layout changes that avoid moving major plumbing or structural walls to reduce permit complexity and cost. Use durable, low-maintenance finishes—vinyl plank flooring with appropriate underlay for sound control is common in Toronto condos.
Plan lighting and ventilation to meet Toronto Building Code and condo HVAC constraints. Prepare detailed finish schedules and sample approvals for the condo board to speed approvals.
Maximizing Value in Your Condo Renovation
Target durable finishes, smart storage, and energy-saving upgrades that buyers notice and that reduce monthly costs. Focus your budget on kitchen, bathroom, lighting, and built-in storage while choosing materials and appliances that balance cost, longevity, and resale appeal.
Upgrade Recommendations
Prioritize a kitchen refresh: replace cabinet fronts or refinish them, install quartz or engineered stone countertops, and fit a 30–36″ stainless steel range with a range hood. These changes modernize appearance without a full gut renovation.
In the bathroom, swap dated vanities for floating cabinets, upgrade to a frameless glass shower door, and choose a handheld plus rain showerhead combo. Replace fixtures with water-efficient models rated at 1.8 GPM or less to appeal to eco-conscious buyers.
Update lighting to layered LED solutions: recessed warm-white downlights on dimmers, under-cabinet task lighting, and a statement pendant in the kitchen. Replace worn flooring with commercial-grade vinyl plank or engineered hardwood that resists moisture and shows well in photos.
Space-Saving Solutions
Install custom built-ins: floor-to-ceiling cabinetry in the living room and a pantry-style closet in the kitchen maximize storage without reducing usable floor area. Use sliding doors on closets to save clearance.
Choose multi-function furniture anchored to walls, such as wall beds with integrated desks or dining tables that fold into cabinetry. In narrow laundry areas, stack units behind a bi-fold or pocket door and add shelving above for detergent and linen storage.
Optimize vertical space in balconies and bathrooms with wall-mounted shelving and slimline cabinets. In open-plan units, define zones with low-profile storage units that double as room dividers while keeping sightlines and natural light.
Sustainability and Energy Efficiency
Install ENERGY STAR appliances: a fridge, dishwasher, and washing machine can lower utility costs and attract buyers seeking lower operating expenses. Look for models with inverter compressors for quieter, more efficient performance.
Replace windows or add high-performance weatherstripping to reduce drafts and improve thermal comfort. If full window replacement isn’t feasible, apply low-e film and ensure seals and sliders operate smoothly.
Upgrade to LED lighting throughout and fit programmable thermostats or smart thermostats compatible with your building’s HVAC setup. Consider low-flow faucets and dual-flush toilets to cut water use; these show clear, verifiable savings on utility bills and inspections.

Pool Liner Installation means you can install a pool liner yourself or hire a pro, but the key is knowing what to expect and choosing the right liner for your pool type. A properly chosen and correctly installed vinyl liner will stop leaks, protect pool structure, and give you 10–15 years of reliable service when installed under suitable conditions. This article walks through the installation steps, common floor and weather considerations, and how to pick a liner that fits your budget and climate.
Follow practical guidance on measuring, surface prep, and wrinkle-free fitting so you avoid costly rework. Expect clear action steps for both aboveground and inground pools, plus tips on when to call an experienced installer for tricky jobs.
Pool Liner Installation Process
This section poor liner walks you through the sequence of physical tasks you must complete: preparing the pool shell, taking precise measurements and choosing the correct liner, carefully positioning and fastening the vinyl, then filling and finishing for a smooth, watertight result.
Preparing the Pool Structure
Drain the pool completely and turn off all electrical equipment. Remove old liner material, adhesives, and debris; use a putty knife and shop vacuum to clear molding compound and grit from corners and ledges.
Inspect walls, steps, and returns for sharp edges, rust, or loose screws. Replace or file down any protrusions, and seal concrete cracks with an appropriate pool-grade sealant. Install or repair foam bead or coping strip as needed to protect the liner bead.
Level and compact the floor base material; a 1–2 inch layer of clean, fine sand or specialized pool underlayment works for most installs. Smooth seams and slope transitions; use a long straightedge to check for hollows or high spots before laying the liner.
Measuring and Selecting the Liner
Measure length, width, wall height, and corner radii using a template method specific to your pool shape. Measure from coping or top edge to the deepest point, and record floor slope dimensions at multiple points to capture any irregularities.
Choose liner gauge (thickness) and material rated for your pool type and climate; thicker gauges resist puncture and last longer in high-traffic or sunny locations. Match patterns and seam placement to avoid awkward seams on stairs or center floors.
Confirm fittings locations — skimmer, return, main drain, and lights — and provide their exact distances from reference points. Order a custom-cut liner or a standard size that accommodates your measured offsets and returns.
Positioning and Securing the Liner
Unfold the liner in shaded conditions to prevent heat expansion. Align the liner pattern and seam orientation with pool geometry; position the bead or overlap at the coping, starting at the 12 o’clock point and working toward 3, 6, and 9 o’clock to maintain even tension.
Attach the liner to the top rail or bead receiver per manufacturer instructions, using snap-in or adhesive methods appropriate for your pool. Use temporary weights along the floor to hold the liner in place while you check for wrinkles and proper fit.
Smooth wrinkles from the center outward using a soft, non-marking tool and by walking gently on the liner’s heel. Trim excess material only where required for fittings. Seal around skimmers and returns with gaskets provided in the kit, tightening screws evenly to prevent distortion.
Filling and Finishing Touches
Begin filling the pool slowly with water while two people smooth the liner simultaneously to guide it into place. Maintain even filling to limit differential pressure; stop periodically to remove remaining small wrinkles and to re-seat bead or coping attachments as water supports the liner.
Install and test all plumbing fittings, ensuring gaskets compress evenly and there are no leaks. Reconnect the filtration system and run the pump with a brush and vacuum to remove any trapped debris.
After reaching normal operating level, check for persistent creases and reposition if needed within the first 24–48 hours. Balance water chemistry and inspect the perimeter for gaps between coping and liner to prevent blowouts or UV damage.
Choosing the Right Pool Liner
Pick a liner that matches your pool type, expected use, and aesthetic goals. Prioritize correct material, appropriate thickness, and a color/pattern that balances appearance with maintenance.
Types of Pool Liners
You’ll choose between three main types: vinyl, fiberglass, and paint/aggregate finishes.
- Vinyl: Common for above-ground and many inground pools. Available as prefabricated or custom-cut sheets. It resists chemical damage and is relatively easy and inexpensive to replace.
- Fiberglass: Delivered as a single shell and installed by professionals. It minimizes seams and staining, and typically requires fewer chemicals. Installation is more expensive and less flexible for unusual shapes.
- Paint and aggregate finishes: Use for concrete pools. Plaster, pebble, and quartz finishes are durable and permanently bonded, but they require resurfacing every 7–20 years depending on wear.
Match liner type to your structure: choose vinyl for cost-effective replacements, fiberglass for low-maintenance shells, and plaster/aggregate when you want a permanent bonded surface.
Liner Material Considerations
Focus on thickness, UV resistance, and seam construction to maximize lifespan.
- Thickness: Vinyl liners commonly range 20–30 mil for residential pools. Thicker liners (28–30 mil) resist punctures and last longer in high-use or pet environments.
- UV and chemical resistance: Look for additives that reduce fading and chlorine breakdown. Strong UV resistance prevents brittleness and color loss if your pool gets prolonged sun.
- Seams and warranty: Factory-welded seams are stronger than on-site seams. Confirm what the warranty covers—seams, fading, and manufacturing defects—and for how many years.
- Installation fit: Custom-cut liners reduce wrinkling and stress. Accurate pool measurements and professional installation help avoid premature failure.
Pattern and Color Selection
Choose color and pattern for water color, heat retention, and hiding debris.
- Color effects: Dark blues and teals deepen water color and absorb more heat. Light blues and white give a tropical, brighter appearance and reflect more light.
- Pattern role: Stone or mosaic patterns disguise dirt, staining, and small imperfections better than solid colors. Busy patterns can reduce the visible need for cleaning.
- Practical trade-offs: Dark colors warm water slightly but show scaling less; light colors show debris but keep water cooler. Consider pool location, surrounding deck tones, and how often you clean the surface.
- Sample testing: Review full-size samples in natural light and wet conditions before buying. Confirm how the color reads from the pool deck and at different times of day.
Provascin: Uses, Benefits, Ingredients, Side Effects, and Everything

SEO in 2026: Complete Guide to Ranking Websites, Pricing & Real Strategies


